Heli Boy
This Section is dedicated to document my work on the locomotion technique
Context:
This project was done while taking the Human-Computer Ineraction for Mixed Reality course at
"Télécom Paris. The goal was to come up with a locomotion technique for a VR experience,
to implement it using unity and to deploy it on the oculus quest.
You can find here my final powerpoint presentation of the project.
1) 3d model of the fans’ system:
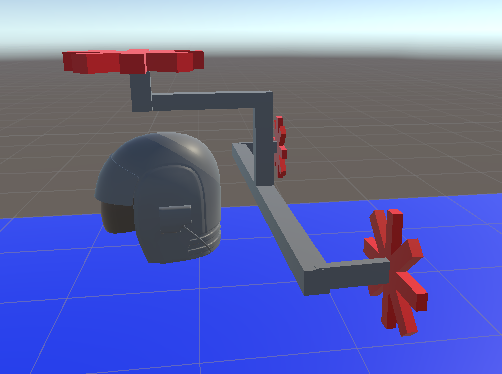
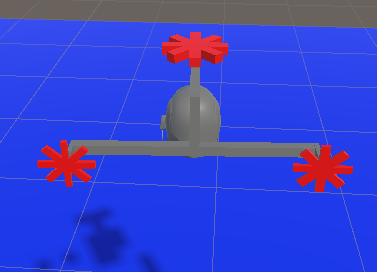
The initial idea was to have only one fan on top of the player. On second thoughts, I noticed that steering with this kind of system is not credible so I added two more fans on the side. The right fan will start spinning if the player wants to go left and the same principle is applied to the left one. I called these two fans “the steering Fans”. The fan situated directly above the helmet is called the elevation fan, this fan will constantly work and tilt forward or backward depending on the direction that the player chooses with his right controller. I found the 3d model of the helmet in this website called turbosquid .


2) Adding a character to the locomotion technique:
I used unity’s asset store to download a 3d model of a human body. It is called
“Adventure Character”
Besides, I applied inverse kinematics on its arms in order to make them follow
the position of the oculus’ controllers. For this I used also an asset provided by unity called
“Fast IK”
I created virtual targets of the hands and mapped their transform relatively to the eyes of the body.
This mapping is done by calculating the relative position of the controllers with respect to the OVRCameraRig.
3) Adjusting the orientation of the neck to follow the HMD orientation
Different modelling softwares does not use the same order of the axis as UNITY. For example, the game object neck inside the body that I imported from the asset store has his axis inverted so I followed a guide from the official unity’s docs. As a summary, I had to create an empty game object outside of the imported body. Then place it exactly where the neck is. The third step is to make this game object as a parent of the neck inside the body and attach to it a script that will map the orientation of the HMD.
4) Movement Placement:
a) Handling the input:
Map the desired rotation of the controllers to two virtual controllers of the system called yokes: ● The right yoke will display only the orientation of the controller along the local x axis. ● The left yoke will display only the orientation of the controller along the local y axis. Below is the script attached to the yokes:
void Update()
{
transform.rotation = Quaternion.Euler(0, leftController.transform.rotation.eulerAngles.y, 0);
}
this video shows how the virtual yokes are following a unique axis of rotation of each of the controllers:
b) Movement:
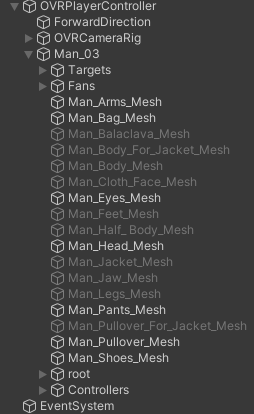
In order to understand how the movement is applied to the player here is the hierarchy of the gameobjects that I used:

After reading the values taken from these two virtual controllers, I map them to the movement of the body. I attached a script called handler.cs that takes in the transform of the two virtual controllers. Then with simple LERP and SLERP I move the transform of the parent which is the OVRPlayerController.
Adjusting speed:
The player can controller how fast he can go by long pressing on the acceleration button. For this I used an increment variable for forward and backward moving.
Below you can find the code of handler.cs:
public class Handler : MonoBehaviour
{
	// Start is called before the first frame update

	public Transform leftController;
	public Transform rightController;

	private float speedCoefficientb;
	private float speedCoefficientf;

	public float maxSpeed;

	public float increment;

	public Transform cameraVR;

	public AudioSource backgroundMusic;

	public ParkourCounter parkourCounter;
	public string stage;

	public bool fpsMode;

	public float u, f;

	void Start()
	{
		u = 0.5f;
		f = 2.0f;
		fpsMode = true;
		speedCoefficientb = 1;
		speedCoefficientf = 1;
	}

	// Update is called once per frame
	void Update()

	{

		if (OVRInput.Get(OVRInput.Button.One))
		{
			backgroundMusic.volume = 1.0f;
			transform.parent.position = Vector3.Lerp(transform.parent.position, transform.parent.position+rightController.forward*speedCoefficientf, Time.deltaTime);
			speedCoefficientf =Mathf.Min(maxSpeed,speedCoefficientf+ increment);


			Debug.Log(speedCoefficientf);

		}
		else
		{
			backgroundMusic.volume = 0.5f;
			speedCoefficientf = 1.0f;
		}

		if (OVRInput.Get(OVRInput.Button.Two))
		{
			backgroundMusic.volume = 1.0f;
			transform.parent.position = Vector3.Lerp(transform.parent.position, transform.parent.position - rightController.forward*speedCoefficientb, Time.deltaTime);
			speedCoefficientb = Mathf.Min(maxSpeed, speedCoefficientb + increment);
		}
		else
		{
			backgroundMusic.volume = 0.5f;
			speedCoefficientb = 1.0f;
		}

		transform.parent.rotation = Quaternion.Slerp(transform.parent.rotation, leftController.rotation, Time.deltaTime);

		if (OVRInput.Get(OVRInput.Button.Four)){
			if (fpsMode)
			{
				fpsMode = false;
				cameraVR.position = cameraVR.position - f*cameraVR.forward + u*cameraVR.up;
			}
			else
			{
				fpsMode = true;
				cameraVR.position = cameraVR.position + f*cameraVR.forward - u*cameraVR.up;
			}

		}

	}
6) Third person mode:
I added a feature to this project that enables the player to switch between first and third person mode. It is done using a translation of the OVRCameraRig behind the player and it is toggled by pressing the 'Y' button of the left controller.
7) Final Demo
8) Evaluation:
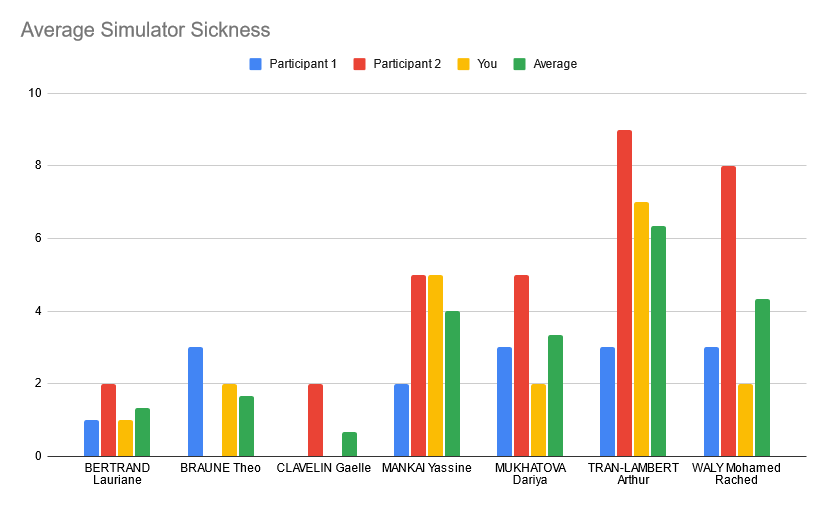
This locomotion is implemented in a way that favors speed on both accuracy and simulator sickness. In order to verify its performance regarding these metris, we conducted a small survey withing our class. Each student has been asked to try out two other locomotion techniques and give them a score on ten for each of the following metrics: "Average Round time", "Average accuracy", "Average simulator sickness" "Average Amount of fun", "Average amount of finished rounds" "Average presence".
The experience consisted in going throught the parkour scene that Wen-Jie Tseng provided and pick coins on the way.
In my case, I was only interested to the first three.
Let's start with the accuracy :
For the speed evaluation, The results shown in the figure below
show that comparing to other locomotion techniques mine has succeded in boosting
the speed metric.

Accuracy:
For the accuracy part, I don’t think that this diagram reflects truly the accuracy
of our locomotion techniques because there are not very
big variations in the diagram even with different types of locomotions.
In spite of this idea, I found that my locomotion technique have a decent accuracy score.

Simulator sickness:
Unfortunately, my locomotion technique induced motion sickness in most of the players.
Actually, some of my close friends couldn’t finish the track. The only one that felt less motion sickness is a classmate
who implemented a technique in the same category (flying).
